Day 234 – Car Washing Tips

**Disclaimer**

This post is out of order. It was originally posted on April 10, 2013, but I have been getting a lot of spam comments (like 8 a day), so I needed to delete it. It’s not even that good of a topic. Stupid spammers!

I. Needed. A. Car. Wash.

But I hate paying a machine to do something that I can do for free, so I had to wait for the weather to be perfect. I figured it doesn’t get much better than today at nearly 90 degrees in April, so I gave it a go.

I looked up some car washing tips and I found a few that I liked (and a few that seemed like I needed more research…baking soda in with the cleaner? I am not convinced.)

This post had a lot of great suggestions, such as parking your car in the shade so that the sun didn’t bake on the soap before you could wash it off. My personal favorite was having two buckets of water: one clean and one soapy. I would dip the rag in the soapy water and scrub the car like normal, and then when I was squirting the soap off of that section of the car with the hose, I tossed it into the clean bucket to rinse off the dirt. Then I would dunk it in the soapy bucket to scrub some more. The soapy bucket stayed nearly perfectly clear and the other bucket…well…it got pretty ugly.

Before this method, I would usually change out my water midway through the wash, but now, that is completely unnecessary.

(Sorry that there are no pictures. I was going to show the dirty water to you, but the bucket was blue and you really could not tell. You can come to my yard and I will show you where I poured the water out. Unfortunately I don’t think that will be very satisfying as the dirt from the water has mixed with the dirt from the dirt…sorry)

Total cost: $0
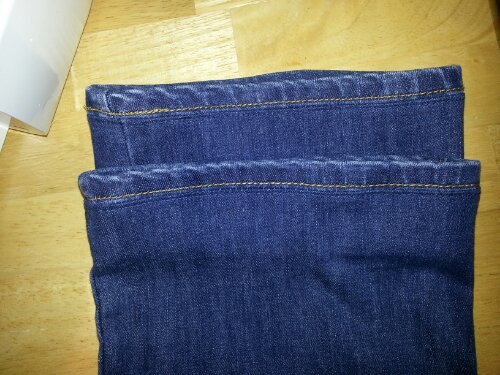
Hemming Jeans

When I think about myself, I generally think I am of average height. I don’t feel particularly taller or shorter than the people around me. I am 5’3″, which may be slightly shorter than “average” but it’s not like I spend my day looking up at people. (It probably doesn’t help that I teach children, almost all of whom are shorter than me due to their 20 year age difference).

So please explain to my why every pair of pants that I buy are too long?

If I had to pay someone to hem all of my pants, I would have spent a fortune over the years, just so I am not stomping all over the ends of pants that come down past my toes. Who are these people who can just wear pants off the rack? Am I the only person who has apparently abnormally short legs? Why can’t women’s pants be measured like men’s pants? Wouldn’t that save us all a lot of headaches?

I am very thankful that I have learned to hem my pants on my own. Before I had a sewing machine, I would painstakingly hand-stitch the hems of nearly all of my new pants. Now, all I have to do is pin them up and a quick zip through the machine, and we are done.

Except for jeans. You can’t just fold up the cuff of jeans and zip them through the machine. Jeans have a very particular hem-line that is difficult to recreate (not that I have ever tried…I just imagine that it is).

I followed the tutorial at this lovely site, and I have to say, I am super-impressed. I don’t think anyone will be following me around next time they see me wearing my jeans saying, “Um, excuse me, but it appears you have hemmed those jeans.” When was the last time anyone actually studied someone’s pants hem? And if you did notice that it looked a little different than you were expecting, would you really say something about it? No. The answer is no. This was not a rhetorical question.

The next time all of you nearly-average-height people have jeans that come past your toes, follow this quick easy tutorial and you will not be sorry.
image

Copy Cat Chick-Fil-A Sandwiches

It has been a little while since I made these, but I haven’t gotten around to blogging about it yet. 
Let me start off by saying that these were very tasty, but they did not actually taste like Chick-Fil-A. According to the husband, it is because I did not use peanut oil. That is a possibility. Maybe we will try that next time. 

One thing that I really liked about this recipe was that I had every ingredient on hand already except the buns (and apparently the peanut oil, which I didn’t think mattered…). I did not need an extensive shopping list, and anything that allows me to use what I already own is a winner in my book. 

Here is the recipe:

  • 2 boneless skinless chicken breasts (I used 1 big one that I cut into 3 pieces)
  • 1/2 cup pickle juice
  • 2 eggs
  • 1/4 cup milk
  • 1 cup flour
  • 2 tbsp powdered sugar
  • 1 tsp paprika
  • 1 tsp salt
  • 1/2 tsp black pepper
  • 1/2 tsp garlic powder
  • 1/2 tsp celery salt
  • 1/2 tsp basil
  • 1 cup peanut oil for frying (I used canola, but we see where that got me) 🙂
  • 4 buns (I used 3, see ingredient #1)
  • pickle slices (I always like to have my pickle slices separate from my sandwich, but don’t worry, I definitely had them with this meal)


1. Put chicken in a ziplock bag and pound until about 1/2 inch thick.
2. Cut each breast into 2 equal pieces.
3. Marinate chicken in pickle juice for about 1 hour (Under full disclosure, I skipped this step. I didn’t have an hour to wait. I was hungry!)
4. Beat together egg and milk in a bowl. 
5. Mix together flour, sugar and spices in a separate bowl. 
6. Heat the oil in a pan to 350 degrees. (I did not have a thermometer, so I splashed a bit of the flour mixture into the pan to see if it would sizzle. When it did, I knew it was ready.)
7. Dip the chicken, first into the egg (covering both sides) and then into the flour mixture, covering both sides. 
8. Place the chicken into the frying pan. (The original recipe said 2 minutes on each side. I think this depends on how closely you were able to pound your chicken into 1/2 inch. Mine was a little thicker, so I had to cook mine a little longer. This seemed to be the most difficult part for me. I was afraid to serve uncooked chicken)
9. Place chicken pieces on a paper towel to absorb the oil. 
10. Serve on toasted buns. (Here is a little side note: I don’t like plain toasted buns. But I do like Chick-Fil-A buns. I attempted to butter the tops and bottoms and bake them for a few minutes to give them a nice buttery Chick-Fil-A-y taste. It tasted good, but it kind of made the buns a little slippery and maybe a tiny bit soggy.)

This recipe is definitely on my to-do-again list…just with peanut oil next time. And perhaps the pickle juice marinade part (although I have to say that does not sound very appetizing!) 

Chicken Pot Pie Recipe

This recipe did not actually come from Pinterest, but I feel that it is my duty to enlighten the world about it.

Yesterday was a snow day, so I decided to make good use of my time by fixing a real-live-actual-dinner. The husband mentioned Chicken Pot Pie, and once I get my mind stuck on something, I have a hard time getting away from it. My first thought was to make Chicken Pot Pie Cupcakes, but I did not have any refrigerated biscuits. My second thought was a cook book recipe that I used the second time I made the Chicken Pot Pie Cupcakes.

You see, a few months ago these really cute kids at my school asked if I would buy a cook book to support their cheer leading squad. Sometimes I can say no, but I felt really heartless this time, so I said yes. I kind of regretted it because really, I get most of my recipes from the internet (hello…Pinterest!) or I just fix things I already know how to make. I have a million cook books. Did I really need one more??? Well, I did. Because this recipe is perfection.

Some time ago I made the cupcakes for the second time, but I did not have any cream of chicken soup. I pulled out this cook book to see if it had any other dinner ideas when I came across the chicken pot pie recipe. I decided to make the sauce from this recipe instead of the cream of chicken soup. I loved it SO much more than the preservatives in a can.

That brings me to yesterday. I pulled out the book and immediately thought that I couldn’t make it because I did not have frozen pie crusts. No one wants chicken pot pie without the crust! Then I got all Martha Stewarty and decided that I didn’t need some stinking pre-made crust…I would make my own. I used my trusty Betty Crocker (Bridal Edition, circa 2005) cook book for the crust recipe.

I had never made pie crust before, and it turns out that it was a little too crumbly. My wise mother told me I should have added more water. I will know better for next time. It wouldn’t really roll out perfectly, so I did my best and just laid it on top. I think it worked out pretty successfully.
image

Here is the recipe:

Ingredients:
1/3 c. margarine or butter
1/3 c. chopped onion (I didn’t have this, so I used minced from a spice jar)
1/3 c. flour
1/2 tsp salt
1/4 tsp pepper
1 1/2 c. chicken broth
2/3 c. milk
2 1/2 to 3 c. shredded chicken or turkey
2 cups frozen mixed vegetables, thawed
1 (15 oz) pkg. Pillsbury Refrigerated Pie Crusts

Heat oven to 450. Prepare pie crusts as directed on package for two-crust pie using 9-inch pie pan. Melt margarine in medium saucepan over medium heat. Add onion; cook 2 minutes or until tender. Add flour, salt and pepper; stir until well blended. Gradually stir in broth and milk, cooking and stirring until bubbly and thickened. Add chicken and mixed vegetables; mix well. Remove from heat. Spoon chicken mixture into crust-lined pan. Top with second crust; seal edges and flute. Cut slits in several places in top crust. Bake 425 for 30-40 minutes or until crust is golden brown. Let stand 5 minutes before serving.


Ok, so I caught you, you probably skimmed over that recipe and said “I will totally make that later and read it right before I am about to start cooking.” That is acceptable. But then you will notice that the beginning of the recipe says to heat the oven to 450 degrees. Later in that same paragraph it says to bake at 425. I am not really sure what the right answer is here. I think I did 425, but my oven is really old and you have to turn the knob to somewhere around 300 if you want it to be somewhere around 400, so I can’t be exactly sure. I think my oven thermometer said 425. I don’t remember it ever making it up to 450. I also had to put my pie in the broiler for a few minutes because the crust never got really brown in the oven. Maybe a higher temperature would have taken care of that. Otherwise, you could set it to 437.5 degrees to go right in the middle.


“Melt in Your Mouth Chicken” and Parmesan Baked Potato Halves

It is safe to say that I have been in a dinner rut recently. Sometimes I come home from work and the last thing I feel like doing is fixing dinner. Thankfully, I have had a good break from too much dinner fixing because of Christmas, New Years Day and all of the related festivities in between.

One thing that I was beginning to notice before the holidays was that a little pre-planning of dinner goes a long way. If I could just simply think of what the next night’s dinner was going to be ahead of time, I was ready for it when fixing time came. I would really like to get back to this planning ahead thing next week when I have to go back to the real world, so I have been scouring Pinterest to find easy (or even not-so-easy sometimes) recipes to fix on work nights.

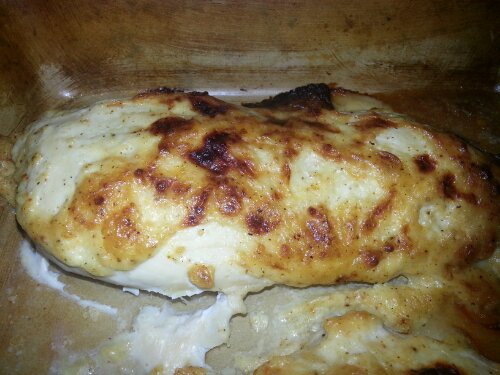
I had off today, so I had plenty of Pinteresting time, and I came across these recipes that I pinned a long time ago: “Melt in Your Mouth Chicken” and Parmesan Baked Potato Halves. The chicken was mediocre to me (the husband loved it), but I thought the potatoes were very tasty.

Melt in Your Mouth Chicken Breast: (I halved the original recipe, so this is what I did)


image

Ingredients

2 chicken breasts (boneless, skinless)

1/2 cup mayo

1/4 cup grated Parmesan cheese (I am thinking shredded may have been tastier)

3/4 cup seasoned salt

1/4 teaspoon black pepper

1/2 teaspoon garlic powder

Mix all of the ingredients together and spread it over the chicken. Place chicken in a baking pan. Bake at 375 degrees for 40-45 minutes.

My personal notes on this: It really was fine. There was nothing wrong with it, I am just not the biggest fan of warm mayonnaise. I knew this going in, I was just hoping it would miraculously transform into something delicious.

Parmesan Baked Potato Halves (The original recipe called for 6 small potatoes. I had large baking potatoes so this is what i did)

Ingredients

2 large baking potatoes, cut into 1/2 inch slices.
1/4 cup melted butter
Grated Parmesan Cheese
Garlic Powder
Seasoned Salt

Pour the melted butter into a 9 x 13 pan. Sprinkle the other ingredients over the butter. Place potato pieces flat into the butter and seasonings.
image

Bake at 400 degrees for 45 minutes. Then let it cool for 5 minutes to be sure the cheese sticks to the potatoes, not the pan (I used a baking stone, which tends to take a little longer to cool, so I upped it to 7 minutes).
image

Using a spatula, lift the potatoes off.
image

I loved these. They were the perfect mix of crispy and chewy. It worked out just fine to slice a larger potato instead of halving smaller ones like the original recipe called for.

The other great thing about both of these recipes is that I had all of the ingredients on hand. I did not have to go out of my way to get anything strange or out of the ordinary.

Crock Pot Apple Butter

When I was a child, my mom would fix biscuits or rolls with dinner sometimes, and we always had different types of jams, jellies or spreads at any given time. Among these spreads, we would occasionally have apple butter and I loved it. Ours was usually the kind that was semi-homemade. We bought it from our local orchard, which would lead you to believe that it was fresh. One day, however, I read the label and it was packaged in Pennsylvania. It was still delicious, but I felt swindled because I had always thought it was homemade in Maryland at the orchard.

As I went off to college and built my own life, it had a noticeable absence of jams, jellies and spreads. The husband doesn’t really enjoy rolls with jelly as much as I do, so I don’t really buy a variety. We always have the standard grape, and sometimes I buy strawberry, but that is about it.

Then, Pinterest entered my life and informed me that I could make my very own apple butter in my very own crock pot. This was the best Pinterest idea I’ve had since the branch painting of July 2013. It was so simple and more delicious than I could have imagined.

Here’s what I did. You can call it a recipe if you want, but it’s hardly specific:

Peel, core, and slice 10-12 apples (I did 11 red delicious…you pick your kind. Mine were 97 cents a pound.)

Put the apples in the crock pot.

Pour 3/4 cup (or so) of sugar. (The original recipe said 1-2 cups. I may or may not have forgotten that my scoop was 1/2 cup so I added 1 full scoop and half of another scoop…best mistake ever!)

1 tablespoon of cinnamon (I estimated)

1/4 teaspoon of ground cloves (I bought whole cloves and used a Pampered Chef tool to grind them myself. I definitely didn’t measure and I don’t think cloves are even necessary in this recipe. Do what works for you)

image

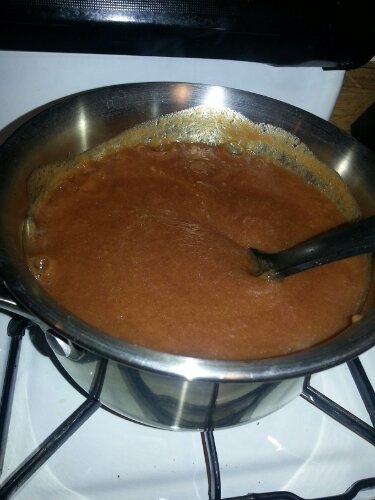
Cook all of this for 10 hours, stirring occasionally. I am not sure how important the stirring part is. I put this in at 8:00 pm and stirred it around 10:00 and that’s about it. When I woke up in the morning, I scooped the chunky apple bits into my blender and pressed “puree” for approximately 3 seconds and it was the perfect consistency.
image

The only issue I had was that it was slightly too watery. Since I made this on a Sunday night, I did not have time to try to cook it down on Monday morning, so I put it in the refrigerator all day and cooked it down when I got home.
image

Now it is the perfect consistency.

image

It gets pretty spattery, even with a splatter screen!

I could almost eat it by the spoonful.

This is definitely on the “to make again soon” list!

Chicken Ranch Tacos

The original title of this recipe is “Baked Chicken Ranch Tacos,” but I will get to that in a minute…

On Tuesday, I was looking for quick recipes to fix with boneless, skinless, chicken breasts. After a long search, I stumbled upon this gem…and then I kept reading the recipe and got to the part where I saw it needed to be cooked in the crock pot. That night, I never actually found a recipe and I had to make something up. I put this taco recipe on my agenda for today since I knew I would be home for dinner.

crock pot chicken

As usual, I was running late this morning, and I remembered it was crock pot night. I scrambled around and gathered the supplies, got it all together, and left for work. Approximately one hour later…

I realized that the County Wide 5th Grade Spelling Bee was tonight at 7:00. That meant I needed to come home, finish my tacos, and go back out to the library to cheer on my kiddos.

I planned on using the soft tortilla shells I had and rolling them like enchiladas and baking them somehow. I figured the shells would get a little crispy and delicious. Instead, Since I did not have ample time to do the baking portion of this recipe, we had them like regular tacos.

I have to say, they were very delicious! It really did not taste ranch-y, but I assume the powdered ranch mix gave it just the kick it needed to not taste like regular tacos. I am curious about how it would be if I had baked them. I guess I will need to try them out another time.ranch chicken taco

Here is the “recipe” as I made it (VERY EASY!!!!)

Ingredients:

  • 2 chicken breasts
  • 1 cup chicken stock
  • 1 packet of chicken taco seasoning
  • 1 packet of ranch dressing mix
  • 1 teaspoon of minced onions (I used the sprinkly kind, but you could probably chop some onion up and that would be good too)
  • 1/2 teaspoon of paprika

Put all of that in the crock pot for however long you feel like…Recipes always say 4-6 hours, but I always do 10 so it is ready when I get home from work. Maybe some fancy crock pot chef would scowl at my philosophy, but it has worked pretty well for me so far.

Once you are ready for it to be finished, shred it with 2 forks. There was a bit of extra liquid, but if you use the 2 forks as tongs, the excess liquid drips right off.

Then, get creative. Maybe you want regular tacos with cheese, salsa and lettuce. Maybe you want ranch dressing on them too. Maybe you want to try to bake them. Use soft shells or hard. The possibilities are endless!


*Here’s a little cheapskate crock pot tip that I do almost every time. I line my pot with a sheet of foil so the baked on gunk is easier to scrub off. Most of it gets tossed away. The foil is cheaper (and only slightly less effective) than those bags you can buy to line your crock pot.

Monster Cookies

I have no problem admitting that I have kind of skipped all things Pinterest for quite some time here recently. I don’t even really miss it all that much.

But then, sometimes I think about doing things that I had pinned long ago. One of those things happens to be these monster cookies and they are DELICIOUS!

This recipe is kind of like your basic peanut butter cookie recipe, but you add oats, which give these cookies just a bit of a different touch. Before the oats are added, the dough is a bit stickier than regular peanut butter cookie dough. When the oats were added, that stickiness was soaked up and it became like any other cookie dough you have probably made before.
image

The original recipe called for M&Ms and semi-sweet chocolate chips, but I put my own spin on that. I always seem to have leftover extras from recipes I have made, so I searched my baking basket and found some remnants of mini M&Ms, some semi-sweet chocolate chips and some peanut butter chips. I poured all of that deliciousness into the dough and got baking.
image


I used my Pampered Chef mini scoop, so they were shaped like a ball. I thought that would go away as they baked, but it didn’t. The first tray of them maintained that shape, even after they cooled. When the other trays came out of the oven, I smushed them down with my mini spatula so they looked more like cookies than a plastic scoop of ice cream that you might find in your niece’s kitchen set (that girl has fed me that ice cream cone a LOT of times!).

Scoop-shaped or flattened, they were tasty!

The website where I found this has a lot of bloggy nonsense before the recipe. I mean, who even wants to read the blog…just skip right to the recipe, right? Well, maybe next time you come to this page you can skip right to it. I kind of scammed you into reading my bloggy nonsense already.

And now…the reason why you really came to this page to begin with…

Monster Cookies

  • 1/2 cup (1 stick ) softened butter
  • 1/2 cup  light brown sugar
  • 1/4 cup granulated sugar
  • 3/4 cup creamy peanut butter
  • 1 large egg
  • 1 teaspoon vanilla extract
  • 1/2 teaspoon baking soda
  • 1 and 1/4 cups flour
  • 1/2 cup quick oats (not instant or whole-rolled oats)
  • 3/4 cup M&Ms (any size or variety)
  • 1/2 cup semi-sweet chocolate chips

(The beauty of this recipe is that you can put whatever kind of M&Ms and chips you want in there. I didn’t measure any of the ones I put in there.)

Directions

Preheat oven to 350 degrees.

1. Cream butter and sugars at medium speed for about 3 minutes.

2. Add the peanut butter, egg, and vanilla, one at a time.

3. Slowly mix in baking soda and flour.

4. Fold in the quick oats and chocolate chips/M&Ms. (If needed, chill the dough for 30 minutes before scooping onto the cookie sheet)

5. Bake for 9-10 minutes. Do not over-bake. Let them cool on a wire rack.

(The original recipe suggested that they last up to a week and that they freeze well. I will caution you that if you want to have these in a week after baking them, you better bake more because they probably won’t last that long)


I forgot to take a picture of the finished product. You can pretty much imagine what they look like.

Omelet Cups

Hello, it’s me again. Remember when I did 365 days of Pinterest projects? Well I took a little break, but I have a quick project to share. I think I would categorize it in the success column.

This blog showed how to make some tasty looking egg cups that had a “crust” of tater tots. Much like Napoleon Dynamite, I love anything that has to do with tots (although I would never stick them into the pocket of my cargo pants…I also would never test out a time machine that Uncle Rico bought on the internet…)

The original post made them in a regular cupcake sized pan, which is great if this is the majority of your meal. I, however, made these for Goodie Day tomorrow at work, and I figure (and hope) there will be other treats for people to have too, so I made them in a mini muffin pan. (Also, I forgot about goodie day and I realized I already had the things to make this recipe.)

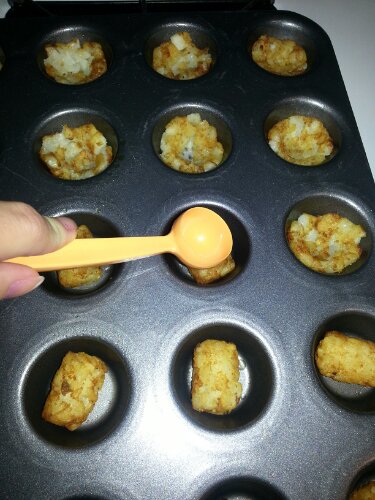
In the bottom of each cup, I placed 1 tater tot and baked for about 10 minutes at 400 degrees. Then, I used my melon baller to squish them down into the bottom of each cup.
image

Next, I poured some whipped eggs into each cup. I added cheese on top, and baked for about 10 more minutes at 350 degrees.
image

I think this would have been great if I had added some sort of breakfast meat, like ham or bacon, but I did not have any. The fun thing about recipes like this is that there are so many variations, so you can make it fit your own likes.

The ones on the original blog were made with peppers, but I think peppers ruin everything they are cooked with (I like them less than bananas if you can believe that!).

I tasted one when they were finished. They are good. Not world-stopping-oh-my-goodness-this-is-amazing good, but I liked them.
image

I hope people give them a try tomorrow. I don’t really want to come home with a nearly full container of omelet cups tomorrow afternoon (which you shouldn’t eat at that point because they have been sitting out all day).

voteforpedrotinacomegetyourdinneryourmomgoestocollege

Reflecting on 365 Days of Pinterest

In case you are just tuning in, I just did a LOT of projects over the past bunch of days. More than 365 actually, so I thought I would take some time to reflect on the ones I really liked and some of the ones that I thought were really stupid. This is by far not an inclusive list because that would take just way too much time and this is, in fact, my day off.

Let’s start off with some of my favorites. Many of them happen to be crafts.

My number one favorite is Day 337 – Tree Branch Wall Hanging

Other favorites include:

89 – Wristlet Key Chain

209 – Burp Cloths

240 – Headband Holder

250 – Caterpillar Onesie

310 – Monster Bib

(My actual list of favorites includes 34 things…these are just my top crafts)

This is also just too great not to mention

Most of my least favorites include things that did not work out like I had hoped. It was sad when my very first day was a flop. I was also really disappointed in Day 326 – A Boredom Buster Game for kids. It just did not work like I thought it would.

I could keep going, but honestly, this post has taken a lot longer than I had hoped for my first day off. I went through all of my pins to find these highlights.

Thanks for being loyal followers this year…Check back in the future for more Pinterest posts…just not every day!